Your First Laravel Project: Path to Becoming a Web Artisan
So you just finished setting up your local environment and you're ready to begin your adventure as a web developer using Laravel. In this article, we'll be looking at what you need to keep in mind as you dive into this amazing PHP framework.
The Basics of PHP
Laravel is a PHP Framework, so having a good understanding of PHP kind of a big deal. Make sure you are familiar with PHP syntax, Object-Oriented Programming (OOP) and basic web development concepts.
Laravel Fundamentals
DOCUMENTATION! DOCUMENTATION! DOCUMENTATION! DOCUMENTATION!
There's no shortcuts to mastering Laravel or, in fact, anything else. Of course, you could start with a tutorial or guide, but you'll always find yourself going back to the DOCS. Learn how to navigate through the Official Laravel Documentation as it is the best tool to understand its fundamentals.
DON'T SKIM... But READ the docs from cover to cover! You don't have to actually remember anything; because as you're going through it, your brain is working whether you're memorizing or not. Kind of creating a map of sort, pin-pointing stuff as you go. So in the future, when you run into an issue, your brain will tell you where to find the solution, because you've already seen it and you know it exists.
Composer
Since you've already prepared your local environment, you most likely installed composer on your machine. Laravel uses it for dependency management, so learning how to use Composer to install, manage and autoload your project's dependencies is crucial for incorporating third-party packages and libraries into your applications. You'll even need Composer to start a new Laravel project, to do that you can use:
composer create-project laravel/laravel example-appIf you globally installed the Laravel installer via Composer using:
composer global require laravel/installerYou can use:
laravel new example-appP.S. If you installed PHP and Composer via Laravel Herd, the Laravel installer is already available to you.
Project Structure
Now that you've initialized a new Laravel project, you can navigate into the "example-app" directory using cd example-app to start working on your application. It will be a fresh Laravel installation with a basic structure that looks like the following:
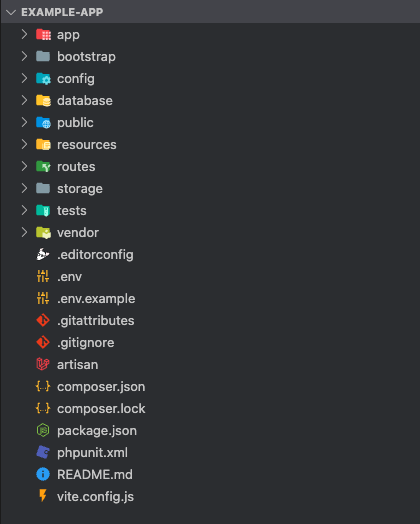
You can now begin building your application by creating routes, models, controllers and views.
For more information, please refer to the Directory Structure section in the documention.
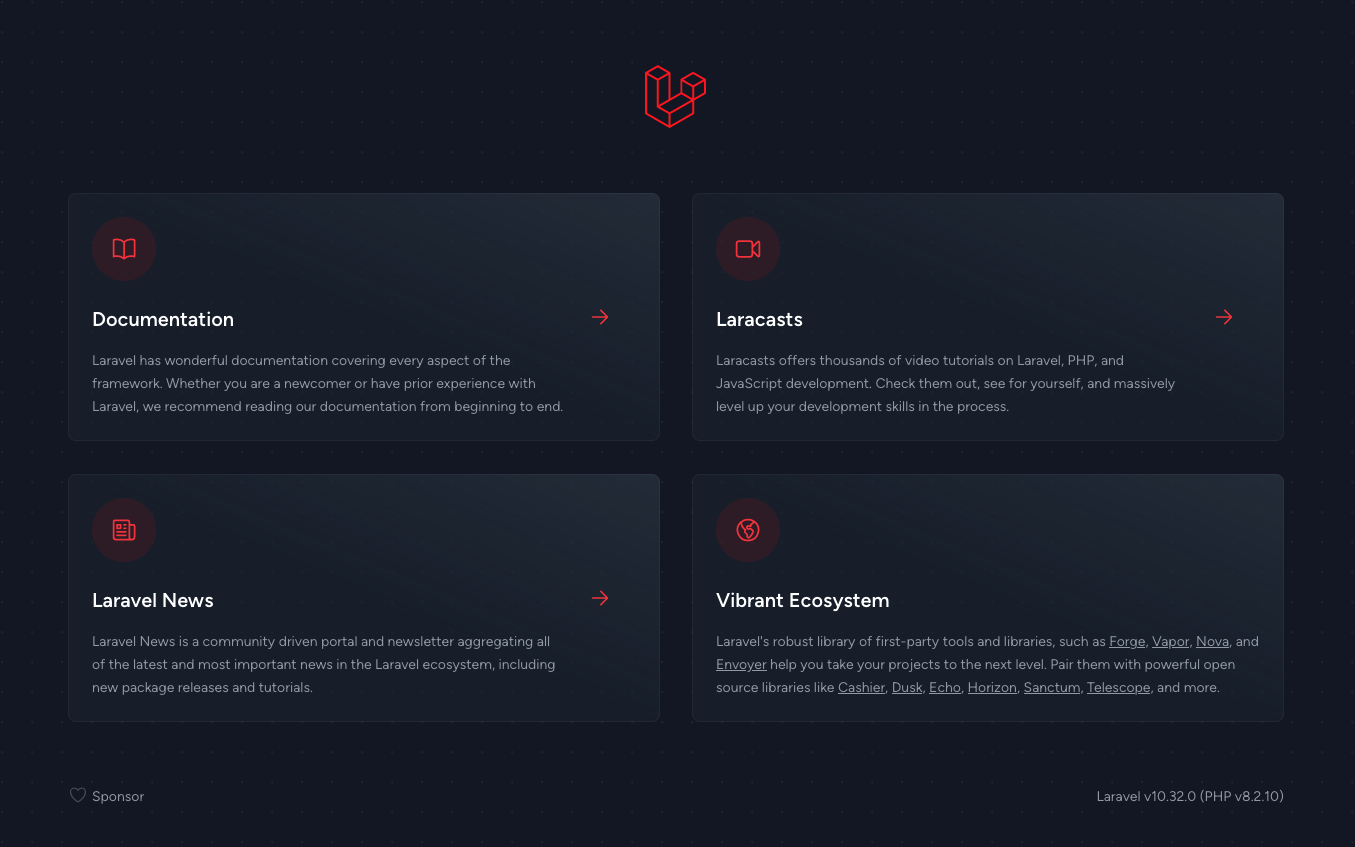
Again, if you're using Laravel Herd, you can preview your application locally by browsing to www.example-app.test, otherwise you can run php artisan serve command in your terminal to start the development server. You should be able to see something like:
Artisan Commands
Artisan is the command-line tool that comes out of the box with Laravel. It provides a variety of helpful commands for common development tasks.
Artisan can generate boilerplate code for various components, such as controllers, models, migrations, etc. For instance, you can create a new controller using the following command:
php artisan make:controller ExampleControllerThis command will create the file ExampleController.php under app/Http/Controllers that includes all the methods you need for a basic controller in your application.
In order to list all artisan commands available to you in your Laravel project, you can run the following:
php artisanAnd to get more information about a specific command, run:
php artisan help <command>Blade Templating Engine
Laravel uses the Blade templating engine. It is the simplest way to manage your application's frontend, so learn the basics of Blade syntax for creating views and templates.
To create a view in Laravel, you can use the following artisan command:
php artisan make:view example-viewDatabase Basics
Get familiar with Laravel's Eloquent ORM (Object-Relational Mapping). Learn how to define models, create migrations and interact with databases. Understanding database relationships is also crucial.
To create a migration in Laravel you can use the following artisan command:
php artisan make:migration create_example_tableAll your migration files will be listed under database/migrations
To run pending migrations, you can use:
php artisan migrateSetting up the database
Before we move forward, we need to tell our application about our database. In this case we'll be setting up a MySQL database. At the moment, I'm using Sequel Ace for macOS to create a database named example_app, but you can use any database management tool you like.
Once you create your database, open up your .env file located inside your application and find the following block:
DB_CONNECTION=mysqlDB_HOST=127.0.0.1DB_PORT=3306DB_DATABASE=example_appDB_USERNAME=rootDB_PASSWORD=If you're following along, this block should look exactly the same on your end, so you don't need to modify anything. If not, replace example_app with the name you gave to your database, root with your database username and provide the password if you used one.
When you're done, save and close your .env file.
Authentication and Authorization
Laravel provides a robust system for user authentication and authorization, which can be extended even further to implement user management, roles and permissions.
To start using Laravel's built-in authentication system, you can use one of Laravel's Starter Kits. These kits automatically scaffold your application with the routes, controllers and views you need to register and authenticate your app's users. In this guide, we'll be using Laravel Breeze & Blade which provides all of the Laravel's authentication features, including registration, login, password reset, email verification and password confirmation. It also includes a simple profile page where users can update their info.
To install Laravel Breeze, run the following:
composer require laravel/breeze --devAfter composer has done installing the Laravel Breeze package, you may run the breeze:install which will prompt you for your preferred frontend stack and testing framework:
php artisan breeze:install
In this example we'll select Blade with Alpine. We'll then be asked if we want to support dark mode in our application, it's up to you, but I'm choosing No for now. After that, we need to pick our testing framework. Again, it's up to you, and I'm picking Pest (we'll cover testing later).

After a few seconds we should see a confirmation message informing us that Breeze has been successfully installed. All we need to do now is to migrate our database by running the following artisan command:
php artisan migrate
P.S. If you didn't prepare your .env previously, running php artisan migrate will trigger a prompt asking if you would like to create the database. If your local environment was correctly set, just select Yes and Laravel will take care of the rest for you.
You can now browse to www.example-app.test again or refresh the page and you should see 2 new links at the top right corner of the page (Log in and Register).

If for any reason you don't see these links, run the following command in your terminal:
npm install && npm run devMiddleware and Routing
A middleware allows you to filter HTTP requests that your application receives. It sits between the request and the core of your app, allowing you to perfom actions or checks on said request before it reaches a controller. Middleware is a crucial component for handling tasks such as authentication, logging and modifying the HTTP request or response.
Here is a basic breakdown of how middleware works:

- HTTP Request Enters: When an HTTP request is made, it goes through the middleware before reaching the controller.
- Middleware Actions: Middleware can perform various actions, such as checking if the user is authenticated, modifying headers, or even stopping the request from reaching the controller based on certain conditions.
- Pass to Controller or Redirect: After the middleware has processed the request, it can either pass it to the controller or redirect it to another route or response.
Routing on the other hand, refers to defining how your application responds to HTTP requests. It determines which controller method should handle a particular request. Laravel's routing system is expressive and flexible, allowing you to define routes for URL patterns as well as HTTP verbs (GET, POST, PUT and DELETE).
Here is an overview of how routing works in Laravel:
- Routes are typically defined in the
routes/web.phporroutes/api.phpfiles. You can use theRoutefacade to define routes for different HTTP methods and URIs.
use Illuminate\Support\Facades\Route;use App\Http\Controllers\ExampleController; Route::get('/example', [ExampleController::class, 'index']);In the above example, when a GET request is made to the /example URI, Laravel will invoke the index method on the ExampleController. This is called Controller handling.
- Route Parameters can be defined to capture parts of the URI.
use Illuminate\Support\Facades\Route;use App\Http\Controllers\UserController; Route::get('/user/{id}', [UserController:class, 'show']);The id parameter can then be accessed in the showmethod of the UserController.
- Routes can be named, making it easier to generate URLs or redirects.
use Illuminate\Support\Facades\Route;use App\Http\Controllers\DashboardController; Route::get('/dashboard', [DashboardController::class, 'index'])->name('dashboard');You can then generate a URL for the named route using the Laravel route helper route('dashboard').
- Routes can be grouped, this allows you to apply middleware, prefixes and other settings to a group of routes instead of repeating yourself.
use Illuminate\Support\Facades\Route; Route::middleware(['auth'])->group(function () { // Routes requiring authentication});- Laravel supports route model binding, allowing you to inject model instances directly into your controller methods.
use Illuminate\Support\Facades\Route;use App\Http\Controllers\UserController; Route::get('/user/{user}', [UserController::class, 'show']);In this example, Laravel will automatically inject the User model corresponding to the {user} parameter.
Understanding and effectively using middleware and routing are fundamental skills in Laravel development, allowing you to create secure and well-organized web applications.
Testing
Laravel comes with PHPUnit for testing out of the box and a phpunit.xml file is already set up for your application. It also ships with convenient helper methods allowing you to expressively test your applications.
The framework also supports Pest, a testing framework with focus on simplicity. It is heavily insipired by Jest (JavaScript testing framework) and is built on top of PHPUnit making it easy to write elegant tests quickly.
As you're starting your journey with Laravel, you don't need to worry too much about automated tests for now, but we'll cover this subject later in a separate article.
The Ecosystem
Laravel has a vibrant ecosystem with various packages and tools. Try to explore popular Laravel packages that can save you time and effort during development, such as Laravel Telescope for debugging, or Pint to automatically fix the styling of your code.

Best Practices
Laravel follows the MVC (Model-View-Controller) pattern. So adhering to the framework's best practices and conventions can go a long way, as it will make your code more maintainable and easier for other Laravel developers to understand.
Take advantage of Laravel's built-in security features, like CSRF protection. Learn about security best practices, such as validation user input, escaping output and protecting against SQL injection and Cross-Site Scripting (XSS) attacks.
Implement effective error handling and logging to identify and troubleshoot issues. Laravel provides robust error handling and logging mechanisms that you can customize to suit your application's needs.
Use version control systems like Git to manage your codebase. Regularly commit changes, create meaningful commit messages and consider branching strategies for collaboratibe development.
Document your code, especially complex or non-trivial parts. Additionally, consider creating high-level and detailed documentation for your application.
Following these best practices will contribute to the overall maintainability, scalability and performance of your Laravel applications, making them easier to work on, both for yourself and for other developers.
Updates
Laravel's landscape is continually evolving. Stay up to date with the latest releases and features by following Laravel's official blog and community forums.
What's next?
Once you've grasped the basics of Laravel, you can enhance your skills by working on practical projects. Start by building a simple To-Do List application, a Blog Platform or even a social media clone like Instagram (the sky is the limit) to reinforce your understanding and apply your knowledge.
Until next time. ✌️